
Admin Training 101
Welcome to Outbound by Enreach!
In this guide, we'll go through the necessary steps to get started as an Administrator in Outbound by Enreach.
To read this guide in Danish, click here.
Head to the Glossary if any terms are unclear.
In this article:
- Key Terms
- Outbound by Enreach
- Creating the Campaign Template
- Campaign Settings
- Dialer Settings
- Other Settings
- Uploading Leads
- Permissions
Key Terms
Before we get started, lets take a look at some of the key terms you'll come across when working in Outbound by Enreach:
What is a Campaign?
What is a Campaign Template?
A Campaign Template is the design of a Campaign. Campaign Templates can be applied to multiple other Campaigns, saving you time when setting up new Campaigns. Once a Campaign Template is chosen for a Campaign it cannot be changed.
Campaign Templates will determine what kind of Lead Data you will upload, and what Result Data you will record when calling a Lead.
What is a Project?
A Project is a container for Campaigns in Outbound by Enreach. Projects are associated with individual clients, and will contain all Campaigns related to that specific client.
As an Administrator, you will be able to create a new Project whenever you receive a new client or assignment. Deletion rules are also set within Projects.
What is Result Data?
Result Data is what you will record as the outcome of a call with a Lead. For example, if a Lead replies "Yes, please" to your offer, you would record the call as a Success.
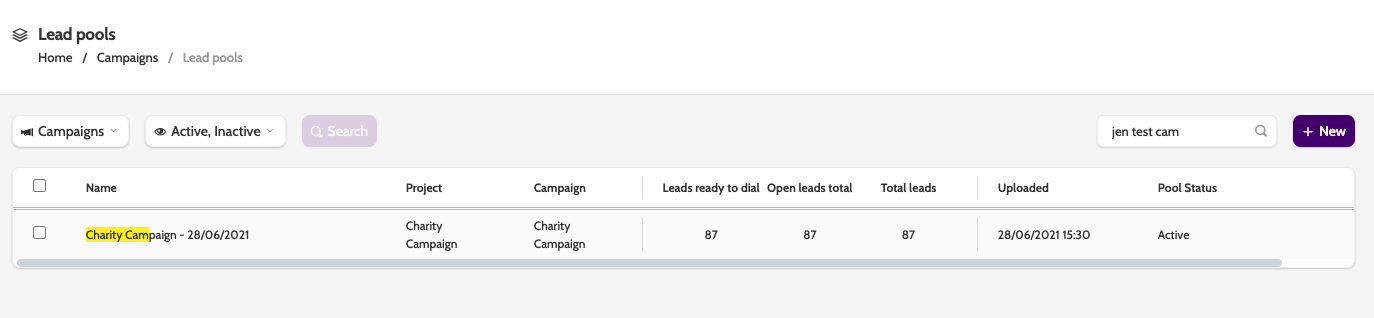
What is a Lead Pool?
A Lead Pool is a list of Leads that are imported into a Campaign, either from a CSV file, created from a Trigger in Outbound by Enreach, or generated by an API command.
How Agents use Lead Pools will be governed by certain settings, such as the priority of Leads, and when Leads can be called.
Outbound by Enreach


 Click on the chat icon to open the Outbound by Enreach chat.


- Get help: Browse the most commonly read Help articles or contact Support.
- Idea Hub: Submit a feature request to Outbound by Enreach, and vote for submitted requests.
- Help articles: Browse the Outbound by Enreach Help Center.

- Pause session: Pause the current session for lunch, a meeting, or a custom reason.
- Settings: Set the preferred language, enable a system pause, customise the contact page, and change the Data View Mode for the Contact Page.
- Work Schedule: View the Outbound by Enreach work schedule.
- Sign out: Sign out of Outbound by Enreach.

Creating the Campaign Template
This article will continue in the form of practical exercises for you to follow to get started as an Administrator in Outbound by Enreach.
Let's start by creating a Campaign Template.
Campaign Templates will determine what kind of Lead Data you will upload, and what Result Data you will record when calling a Lead.
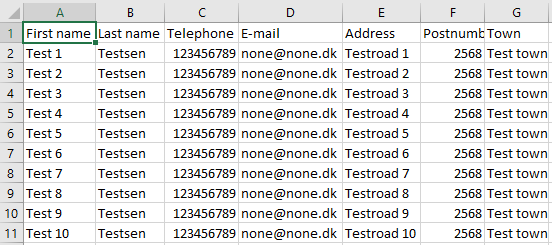
Before you begin, make sure you have a CSV file that contains all the Leads you want to upload. A typical CSV file will look something like the image below.
How to Create a Campaign Template
1. In the Outbound by Enreach navigation page, expand Campaigns in the left side menu, and click Campaign Templates.

2. Click New.

3. Choose a name for your Campaign Template.

4. Under Base Campaign Template on, expand the drop-down menu and choose Upload File.

5. Click Choose File to upload the CSV file from your computer. Click Next.

Master Data Fields

- Text (Small Field): Suitable for lines of text shorter than 30 characters. Extra characters will not be visible to the Agent, so for longer texts use the Data Type Text (Large Field).
- Phone Number: A necessary field that designates the Lead's phone number.
How to Edit the Master Data Fields


Result Data Fields
When you have configured all of your Master Lead Data, it's time to configure your Result Data!
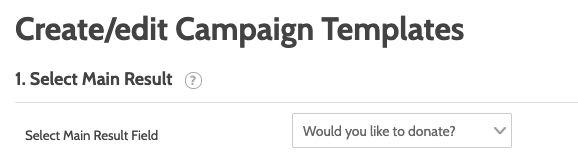
In Outbound by Enreach, the outcome of calls to your Leads are known as Results. These will differ depending on what type of Campaign you are running. You can have several Results, but it is mandatory to have a Main Outcome Data Type, which is the basic "Yes, please," or "No, thanks" option.
In this example, let's build a charity campaign for an imaginary client asking for donations. Our client needs the following from the Leads:
- Would the lead like to donate? (Yes/No)
- If Yes: How much per month?
- How many months would the lead like to donate? (1/3/12)
- A calculation field that sums the full donation amount.
- Would the Lead like a monthly e-mail from the Client?
Let's begin with the Main Outcome, which is aways a drop-down menu, or Picklist.
Picklist and Other Outcomes
For our first Result Data Fields, we want to ask our Lead would they would like to donate. Here's how to do that:
1. Click the pencil icon on the Result Data Field you wish to edit.

2. Select Main Outcome in the Data Type drop-down menu.

3. To enter the Main Outcomes, Enter the Name and the Value in the Select Options text boxes.
Click the green arrow to save, and repeat as many times as necessary.
If you need to delete a Main Outcome, select the outcome you wish to delete and click the red stop icon.

For our next Result Data Field, we want to ask our Lead how much per month they want to donate. Here's how to do that:

For our next Result Data Field, we want to ask our Lead how many months they want to donate.
Options for a Picklist will be entered the same was as when you configured your Main Outcome. Here's how to do that:

For our next Result Data Field, we want to ask our Lead if they would like to receive a monthly newsletter.
As a Yes/No response, we will choose the Checkbox Data Type. Here's how to do that:

For our final Result Data Field, we want to calculate how much money our Lead will donate.
Under Composition Template Type, select Formula from the drop-down menu.
Next, click How much per month and How many months from the Composition Template, including the multiplication operator (*) between the fields.
Outbound by Enreach will automatically calculate the total forecasted donation based on the previously configured Result Data Fields.

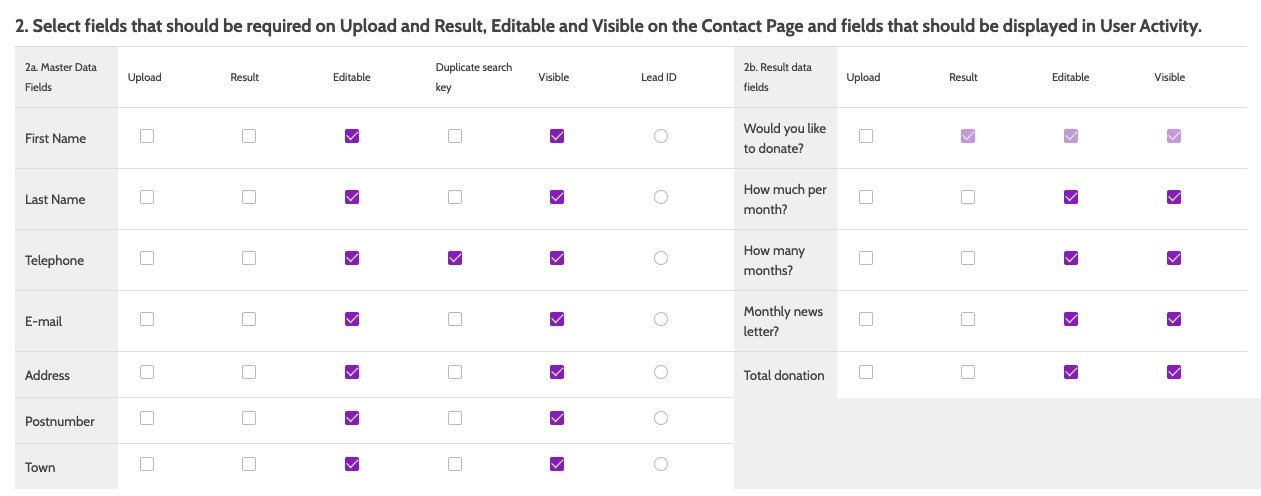
Field Behaviour and Use
Step 1
In the Name column will be the outcomes you configured.
Define how the Leads will be closed by matching these to one of the four Outbound by Enreach results ( Success, Not Interested, Invalid, Unqualified).

Step 2
In Step 2 you will decide how the Master Data Fields and Result Data Fields will be used. Check the following boxes if;
- Upload: The Field is required to have content when uploading Leads to the Campaign.
- Result: The Field is a required Result Field.
- Editable: The Agent is allowed to edit this Field.
- Duplicate search key: The Field should be used when looking for duplicate Leads.
- Visible: The Field should be visible to the Agent.
- Lead ID: The Field a Lead ID (unique across all Campaigns in the company).
Field Dependencies
Now your Campaign Template is ready, it's time to tell Outbound by Enreach what Fields to show depending on the information an Agent will receive from a Lead.
So, in our Campaign, only after the Lead agrees to donate to our charity will the options for How much? and How often? become visible.
How to Configure the Field Dependencies
1. As our Main Outcome is Want to Donate?, I want to hide all the outcomes related to a Yes Main Result until the Lead responds Yes.
Expand the Field Dependencies drop-down, select Want to Donate?, and click Add.

2. In Actions, check the box marked Make the field invisible until the dependency has the right value.
This will ensure that How much? will be visible only when the Lead has responded Yes to Want to Donate?
3. In Only apply action if Want to Donate? has value, check the box marked Yes.
This will ensure that when the Lead has responded that they would like to donate, and the Agent records the value Yes, only then will the Field How much? be visible to the Agent.

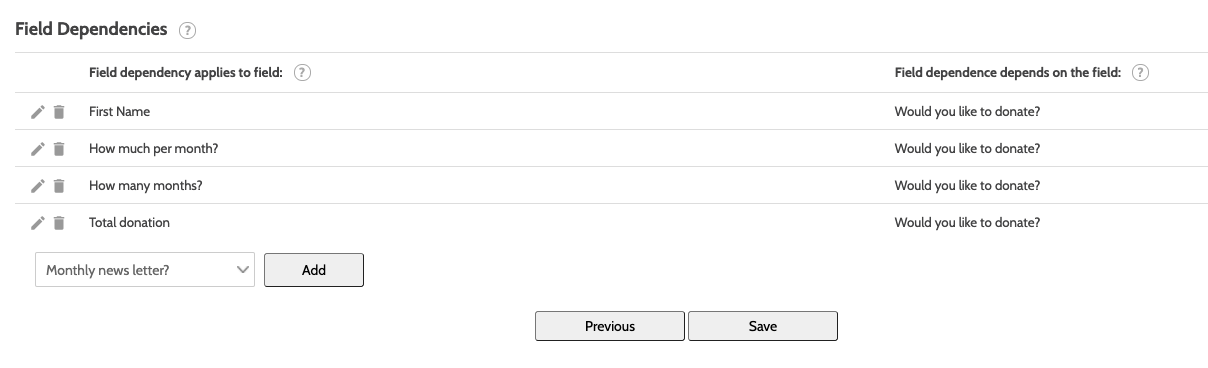
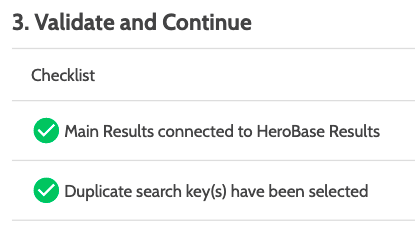
Click Save at the bottom of the screen when you're done.
Congratulations, you have completed your first Campaign Template in Outbound by Enreach!
Campaign Settings
Now the Campaign Template is complete, it's time to complete the Campaign Settings, upload Leads, and get to work!
After clicking Save you will automatically be taken to the Edit Campaign home.
Here, you'll find 4 mandatory fields to complete.
- Campaign Name: This is the name of your Campaign
- Project: Expand the drop-down menu to select the Project that will contain your Campaign. Click +Create to create a new Project.
- Campaign Template: This is the name of the Campaign Template you'll use for your Campaign.

- Telephony: This is the country where you'll make calls to your Leads from.

Dialer Settings
Now it's time to configure the Dialer Settings for your Campaign.
1. In the Edit Campaign menu, select Dialer Settings.

2. Under Dialer type, select Power Dialer. This Dialer type will call Leads one-by-one as soon as the Agent is ready, and is recommended for calling fresh Lead Pools.
To read more about other Dialer Types, check out the Outbound by Enreach Glossary.

3. Under Call data preview, check Preview for All call types.
This will allow the Agents to preview the Master Lead Data before being connected to the Lead. Adjust the preview time in seconds by clicking the arrows.

4. Under Caller ID, decide what caller ID the Lead will see when receiving a call from an Agent. For our Charity Campaign, we will set the the Caller ID to Campaign, and select the correct number from the drop-down menu.
If a Lead needs to return a call, a Campaign Caller ID will ensure the Lead will be connected to an Agent that is working within the same Campaign.

5. Under Redial Settings, decide how many hours to wait until you can redial a Lead that did not answer.
The default setting is 25 hours, so if your Lead did not answer a call at 10am on a Monday, a Redial will be scheduled for 11am on Tuesday. Adjust the maximum number of days for scheduling Redials by clicking the arrows.

6. Under Max redial settings, you can further adjust how your Agents will be able to redial Leads. For our Charity Campaign, I have checked Contact Attempts, selected Global, and set the Max Total attempts at 15.
This means that our Agents will be allowed 15 contact attempts with a Lead, even if the Lead had more than one listed phone number. So, unanswered calls to all phone numbers associated with a Lead will count only to 1 contact attempt.
Global sets the maximum total redial attempts, regardless of redial type.

7. Under Dialing duration, set how many seconds the Outbound by Enreach Dialer will call a Lead for, before the call is determined to be unanswered.
The default is 25 seconds, which will cut the call before most answering machines pick up.
Private Redials can usually have a longer dialing duration, as the Lead has already expressed interest.
 8. Under Leads expiration, adjust how many days Open Leads and Private Redials will be active for.
Adjust the expiration time in days by clicking the arrows.

9. Adjust Other Settings for your Campaign in our final Dialer Settings.
Check the Dial through box to ensure the Outbound by Enreach Dialer will try all phone numbers associated with a Lead before terminating the call.

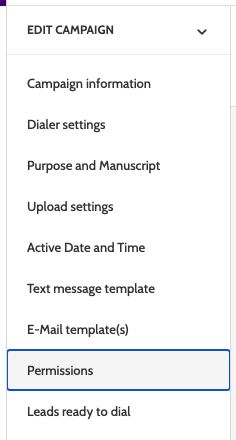
Other Settings
Your Charity Campaign is now ready to upload Leads! Jump Directly below to learn how, or check out the remaining Campaign Settings to see what you can do with Outbound by Enreach.

- Purpose and Manuscript: Enter a purpose of the Campaign with goals for the Agent, and a manuscript if one is required.
- Upload Settings: Adjust the settings for duplicate Lead uploads.
- Active Date and Time: Set the date and time for when the Campaign is active.
- Text Message Template: Create a template to send SMS messages to Leads.
- E-mail Template(s): Select which E-mail templates should be available on this Campaign.
- Permissions: Edit Organisation and User permissions for this Campaign.
- Leads Ready to Dial: In Campaign overview there is a Distribution Graph, a colour-coded indication of how many Leads you have ready to call in each Campaign. Here you can set the minimum boundary for how many Leads appear in each colour.
- Triggers: Configure Campaign Triggers to automate actions such as Clone, Send E-mail, and Send SMS.
- Lead Filter: Filter out certain Leads for specific Agents or Teams.
- Contact Attempts Filters: Schedule the time frame in which Leads with certain number of contact attempts will be called.
- Call Recording: Decide whether you want call to record calls, and configure deletion rules.
Uploading Leads
The final step before using your Campaign to call Leads is to upload them! This can be done by uploading Leads to the Outbound by Enreach system with a CSV file, through Triggers, or via the Outbound by Enreach API.
For our Charity Campaign, let's upload our Leads via a CSV file.
1. To upload your Lead Pool, expand the Campaigns drop-down menu and select Upload Lead Pool.
 2. Follow the steps in the upload wizard to upload your Lead Pool. For in-depth instructions on how to do this, head to this guide.
In File Upload, click Choose File and upload the same CSV file you used to create your Campaign Template.


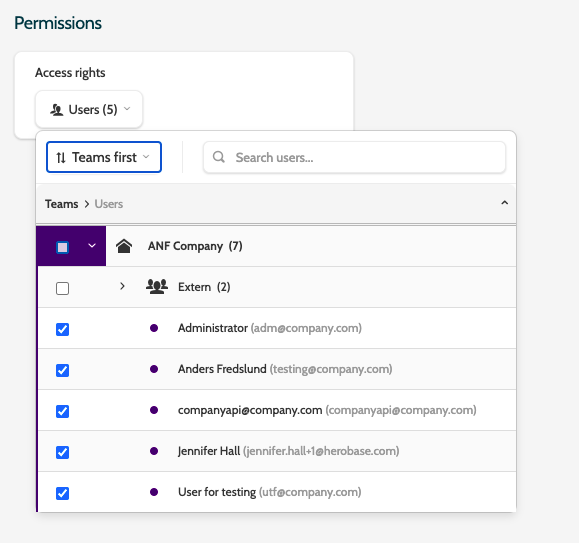
Permissions

All done?
You have now created your first, fully-functional Campaign in Outbound by Enreach.